 5 bootable “tools suits” to upgrade or troubleshoot a computer
I came with a very basic need: copy a Hard Disk Drive to another one. Well, there were some constraints:
- The HDD is used in a Network Attached Storage (NAS) running Linux, thus data on it are in native Linux format.
- The source HDD is twice the size of the target HDD, while that actual data volume is of course smaller than the space available on the target HDD.
Trust me, doing this “simple task” turned into a 3 days (and nights) nightmare. The good side of this, is that I (re-) discovered fantastic tools everyone should be aware of. All this “Tools Suits” are a collection of useful tools, compiled over a bootable CD, or even bootable usb stick. My advice: you should select the compilation that better fit your need and make a bootable CD now. The day your computer will stop booting, you’ll thank me ![]()
Howto Use a USB stick or bootable CD
To run a bootable CD or bootable USB stick, you may need to do more than just inserting the media. Or not. So, get a first try: insert the media, and reboot your computer. If your computer starts Windows (or MacOS, or Linux or whatever you used to run), then you indeed have to do something more. You’ll have t tell the computer to look for a bootable external media: it’s either an option during computer startup sequence (known as POST), like pressing the F8 key like crazy on some ASUS motherboard based computer, or holding donw the ‘c’ key on a recent MacBook. If you don’t find such option, your last chance is to go to the “BIOS SETUP” (again, press a specific key, may be [F1], may be [DELETE], may be [F10]… depending on your computer: read the manual … or the screen!), go to the “BOOT” submenu, then change the order to have your media booting first. However, remember that if you forget to change it back, your computer will always try to boot from the removable media first… if an infected media is inserted, you’ll infect your computer while booting (this is probably the oldest computer virus infection scheme: bootable floppies). Finally, keep in mind that even if almost 100% of “running” computers are able to boot from a CD (while it was not true in 90’s for instance), some of them may not be able to boot from a USB stick. Especially if the stick is not plugged directly to the computer, but through an USB hub. If this is the case, try again with the USB stick plugged directly to any of the computer USB port. The way to get the bootable media depends on the “Tools suit”:
Ultimate Boot CD
The Ultimate Boot CD is a collection of “DOS-Like” tools. Being “DOS-Like” doesn’t means that you will need to learn complex command lines: most of the included tools comes with a delicious 90’s “graphical” interface:
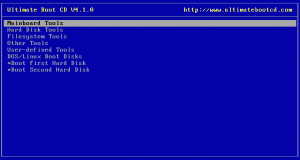
The included tools range from diagnostic to repair, in various areas:
- Motherboard tools (CPU, memory, peripherals, …)
- Hard Disk Tools (vendor specific and universal partition and cloning tools)
- Filesystem Tools (NT password, AntiVirus, …)
- Miscellaneous Tools (Network, DOS & Linux boot disks, …)
UBCD USB stick or CD creation
To build a CD, you just need to download the ISO image and use any burn software. To get a bootable USB stick, it’s a bit more complicated: First, you will need to either burn the ISO file to a CD, or extract the files within the ISO file to your hard disk using a suitable utility. Then, use the included tools\ubcd2usb\ubcd2usb.bat to write UBCD to your USB memory stick. Note that ubcd2usb.bat will format and erase your entire USB memory stick. And remember: some of the UBCD apps may not work when started from the bootable USB stick.
UBCD4Win
UBCD4Win stands for Ultimate Boot CD For Windows. As it’s name suggests, it’s the Windows based version of the Ultimate Boot CD mentionned above. Once you’ve booted on the UBCD4Win, you’ll experience a classical WinXP environnement, allowing to run Windows Applications and tools.

Among the provided tools, you’ll find:
- Disk cloning and partition tools
- Anti-Virus softwares
- A bunch of drivers for various disk, LAN and other interfaces
- Disk, memory and benchmark diagnotic tools
- Some commercial tools (licence to be purchased separately)
Howto create a UBCD4Win Bootable CD
Due to the WinXP boot environnement, you’ll not download an ISO image, but a tool allowing to build a bootable CD. And you will need a Windows XP (SP1 or SP2) original CD. So the steps are:
- Download latest Ultimate Boot CD for Windows
- Install the configuration tool
- Run the configuration tool, generate an ISO image
- Burn the Iso image onto a CD
SystemRescueCD
The SystemRescueCd is a Linux system rescue disk useful for administrating or repairing your system and data after a crash. It embeds various Linux environments, from command line to graphical ones. The SystemRescueCd is available is several versions: one for x86 compatible architecture (PC’s and Intel MacBooks), one for SPARC (SUN), one for PowerPC (older Mac computers). It comes with a lot of linux software such:
- as system tools (parted, partimage, fstools, …)
- basic tools (editors, midnight commander, network tools…)
As most of the tools are graphical, newbie should not be afraid by the “Linux world”. However, beware: Unix command lines won’t ask you “are sure?”. It will obey, whatever you ask them to do. Even erase your main Hard Disk Drive in 2 secs. So, think twice when using command line tools!
Howto burn a SystemRescueCD or create a bootable USB stick
To burn a SystemRescueCd, it is as simple as download the ISO image and burn the image onto a blank CD. However, make sure to download the correct ISO file:
- The x86 edition supports both 32bits (IA32) and 64bits (AMD64 / EM64T) processors will probably be the one for you, even if you have a Intel based MacBook.
- The SPARC edition is also available if you have an hardware based on the Sun architecture.
- The PowerPC edition is needed for older Mac Computers, but may work for other PowerPC based computing units, like some NAS.
To get a bootable stick, some more steps are required, as explained on the SystemRescueCd Wiki.
CloneZilla
The CloneZilla bootable CD is focusing on one system administrator activity: making system disk image and duplicating the image over several computer for either repair, student classroom reload or computer deployment. Clonezilla is available in two versions: Clonezilla live and Clonezilla SE (server edition). Clonezilla live is suitable for single machine backup and restore. While Clonezilla SE is for massive deployment, it can clone many (40 plus!) computers simultaneously. Clonezilla saves and restores only used blocks in the harddisk. This increases the clone efficiency: 10 minutes to clone a 5.6 GBytes system image to 41 computers via multicasting! Duplicate IP addresses and computer names can be avoided using drbl-Winroll, also written by the CloneZilla team. Clonezilla is using several Linux tools:
HowTo create and use a Clonezilla bootable media
Making a bootable CloneZilla live CD/DVD is pretty easy: download the Clonezilla live ISO image and burn it. Making a bootable CloneZilla Live USB stick is a bit easier than usual: no need to burn a CD! To make your USB flash drive or hard drive bootable, first download Clonezilla live zip file and extract the files on your USB flash drive or USB hard drive. Then, make it bootable on a MS Windows or GNU/Linux computer (look at the CloneZilla instructions). To setup a CloneZilla Server, read carefully the CloneZilla documentation! Important CloneZilla Live password information: Two accounts are available:
- account “user” with sudo privilege, password is “live”,
- administration account “root”, no password. Therefore you can not login as root, the only way to get root privilege is to login as user, and run “sudo su -” to become root.
Bart’s PE
I could’nt close this review without a mention of Bart’s Preinstalled Environment (BartPE) bootable live windows CD/DVD. Developped from scratch by Bart Lagerweij, it opened a new Era in home (and company) computer deployment. Inspired by Microsoft WinPE, and application only available to Microsoft Software Assurance Members.
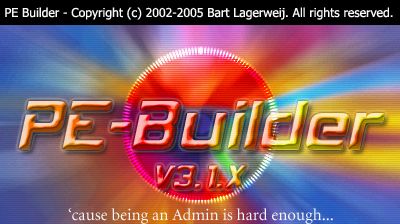
So, if you want to generate your own BartPE bootable CD, you should have a look at the PE Builder software written by Bart. Of course, you’ll still need a WinXP original CD, like for UBCD4Win… which is indeed based on Bart’s PE Builder Software.
What about you ?
Do you have any experience to share using one of this tools, or even another bootable media to suggest? Feel free to post your comments!
My hard drive on my system stopped working and there is no way for me to get it to boot. Can anyone recommend a good troubleshooting service out there? Thanks in advance!
Bonjour à tous et merci pour ce tuto et commentaires…
Si cela peut aider voici un tuto basé sur mon expérience en CD et USB de dépannage à l’aide notamment des logiciel UltraIso et WinToFlash. UltraIso gratuit est à mes yeux le plus convaincant et assez simple d’utilisation comparé à beaucoup d’autres aux résultats plus qu’aléatoires… PEtoUSB entre autres m’a toujours posé des problèmes et propose trop d’étapes plus compliquées.
______________________________________________________________________
Avec le logiciel UltraIso, il existe plusieurs méthodes pour rendre une clé USB bootable dans Windows XP. Pour les versions ultérieures, il est possible que cela fonctionne aussi ?
Pour PEBuilder UltraIso grave l’image iso par double clic sur BarPE.iso / Amorçable / Ecrire image de disque.
Pour UBCD même procédure UltraIso mais avec le fichier UBCD.iso.
ATTENTION, ne pas confondre UBCD4win (environnement Windows) et UBCD (environnement linux). Tous deux contiennent une multitude d’outils de dépannage accessibles hors OS au démarrage du PC.
A la base, les ISO créés par ces programmes sont utilisés pour graver les CD ou DVD. Si UltraIso fonctionne bien pour en graver les clés USB BartPE et UBCD, la procédure ne fonctionne pas du tout pour UBCD4Win.iso sans le modifier. Le boot est corrompu car le boot linux prend la main au dépend de XP. Seules les variantes décrites ci-dessous sont possibles pour y remédier.
Quand une clé UBCD4Win, construite avec UBUSB, fonctionne bien, on peut en faire une image ISO avec UltraIso. Un boot XP sera utilisé et le menu d’entrée LINUX supprimé tout en allant à l’essentiel c’est à dire un environnement BartPE comme dans PEBuilder.
3 méthodes possibles :
1ère méthode : Dans l’explorateur local clic droit sur la clé / Ajouter / Enregistrer sous image ISO UBUSB (La limite de 300 Mo n’est pas une contrainte).
Pour graver l’image ainsi créée sur une clé :
Amorçable / Ecrire image de disque. Mais la clé ne bootera pas bien, il faut reécrire le secteur de boot :
Amorçable / Ecrire image de disque / Xpress Boot / Ecrire le nouveau secteur de boot sur le disque / Windows NT/2K/XP.
2ème méthode : Ouvrir l’ISO UBUSB, supprimer soit tout le dossier SYSLINUX soit dans le dossier SYSLINUX le fichier d’amorce linux SYSLINUX.CFG et enregistrer ce nouvel ISO sous UBUSB. Ainsi cet ISO pourra être directement gravé sur une clé avec un boot XP par
Amorçable / Ecrire image de disque / Méthode de gravure / USB.HDD+.
3ème méthode : Utiliser l’image ISO créée pour graver le CD et supprimer soit SYSLINUX soit SYSLINUX.CFG.
Enregistrer ce nouvel ISO sous un nom différent comme UBUSBCD et le graver comme expliqué en 2ème méthode. Cependant l’environnement BartPE est minimum sans incidence au fond, pas d’icônes de bureau et limitation des propriétés de l’affichage. Cet ISO fonctionnera aussi pour graver le DVD.
Rappel ; ces 3 méthodes ne sont possibles qu’avec UltraIso assez simples et beaucoup plus rapides comparées aux divers autres logiciels de boot USB.
De même on peut aussi en créer une image IMA :
Amorçable / Créer image de disque / Choisir la clé correspondante / Indiquer un nom pour le fichier de sortie / Créer.
L’image ainsi créée avec son menu linux d’origine peut être gravée sur une clé. Le fichier image correspond à la taille de la clé donc bien plus volumineux qu’un ISO :
Clic sur l’image choisie dans l’explorateur local / Amorçable / Ecrire image de disque / Méthode de gravure / RAW (brut, plus long mais un copycat sans problème de boot ultérieur).
Toujours attention de bien indiquer la lettre de lecteur USB correspondante.
Il arrive aussi qu’après la création d’une clé USB UBCD4win ou BartPE avec WinToFlash (version 6 car impossible avec ultérieure payante pour cette fonction) malgré un test USB concluant avec UBUSB, la clé refuse de booter. Il faut réécrire le secteur de boot sur la clé connectée sur un port USB en utilisant soit :
UBUSB / Tools / Install bootloader only soit
UltraIso / Amorçable / Ecrire image de disque / Xpress Boot / Ecrire le nouveau secteur de boot sur le disque / Windows NT/2K/XP soit encore pour UBCD4Win utiliser UltraIso pour faire une image ISO de la clé nommée UBUSB_W2F par exemple, supprimer le dossier SYSLINUX et réenregistrer l’ISO ainsi. Cet ISO pourra être directement gravé sur une clé avec un boot XP par
Amorçable / Ecrire image de disque / Méthode de gravure / USB.HDD+ comme expliqué dans la 2ème méthode décrite plus haut.
Annexe concernant WinToFlash : Outre l’installation de Windows sur clé USB, W2F permet aussi cela pour un BartPE : ouvrir Win2F /onglet Tâche / Choisir / Copier le CD/DVD de WinPE sur une lecteur USB / Courir / Indiquer pour la source l’emplacement du dossier BartPE créé par UBCD4Win ou PEBuilder / Indiquer l’emplacement du lecteur USB / Exécuter.
Conservez ces ISO précieusement pour graver vos clé USB à la demande avec UltraIso.
Si une autre clé USB est connectée, bien indiquer la lettre de lecteur USB correspondante.